This guide is intended for Server Administrators (Enterprise Offer) and all Organization Administrators responsible for organizing and managing spaces and users.
Organizing workspaces
To allow you to be very precise in your access management, Kantree allows you to manage settings in 5 spaces.
5 workspaces
- Organization
- Team
- Workspace
- Personal Workspace
- Portfolio
Workspace organization diagram
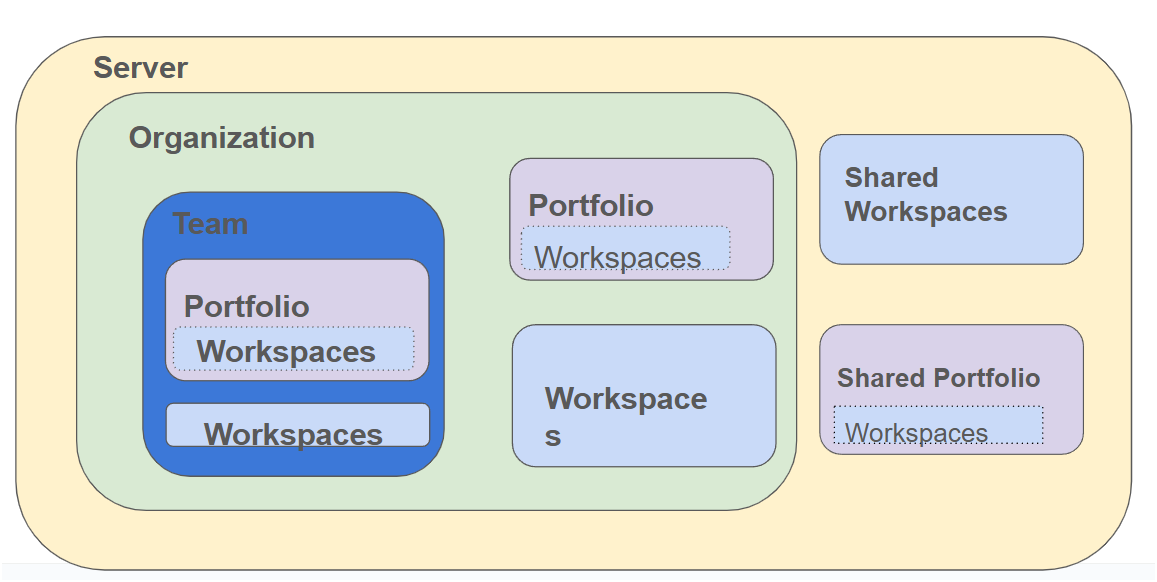

Definitions - Workspaces
- An
Organizationis a distinct space and can represent a company, a department, a team. - A
Teamallows you to organize workspaces, it can represent departments, teams, work themes - A
Workspaceis a working space within an Organization or the Personal Workspaces space. Personal Workspacesspace is an area accessible only by the user who created them.Portfoliois an area that allows you to create views by cross-referencing data from multiple workspaces.
When you start with Kantree, you can ask yourself the following questions:
Should I create one or several organizations? Do I manage my project in a single workspace or several? Is there an advantage to creating teams?
Questions to ask yourself before organizing spaces in Kantree
The Organization: just one or several?
If you want to promote information sharing and implement cross-functionality within your company, it is recommended not to multiply organizations.
👉 👉 1 single organization is enough to represent the company Creating a single organization allows all its members to see all existing workspaces with the “Visible to Team” visibility option - [See Permissions Guide](/help/guides/collaboration)
Organization members cannot join the workspace (become a member) without invitation unless you have activated this option in the Workspace Settings - [See Permissions Guide](/help/guides/collaboration)
If you need to isolate departments, business units, teams, projects, you can choose to create multiple organizations.
👉 multiple organizations can represent departments / business units
Inter-organization links are limited. You cannot cross-reference data between two workspaces belonging to two different organizations [See Portfolio Guide](/help/guides/portfolio). It is not possible to make relationships between cards located in two different organizations.
To properly structure your organizations, you need to consider the needs of members and interactions. If the teams are distinct and you want one organization per team, these users will need to be “declared” at the level of each organization.
When to use the Personal Workspaces space?
This space allows you to manage your personal projects. The workspaces available in this space are not visible on the Organization page, so its members are not aware of their existence. However, you can still invite members by assigning them a predefined role in Kantree (no custom role possible). [See Permissions Guide](/help/guides/collaboration)
Use this space if you want to:
👉 isolate a project restricted to yourself for editing or observation for members
The personal workspace cannot use a shared card type, a field shared at the organization level, or a template. However, it has access to the Kantree template library.
The workspace: create 1 or several?
A workspace can manage any type of data within the same space. However, to facilitate readability and use, we recommend that you ask yourself the following questions: Are the same people who need to edit the data? Does the data follow an identical workflow?
If yes then:
👉 1 single workspace is coherent
If your workspace contains a large amount of data and it is very varied, concerning only part of the members, we recommend that you consider creating several workspaces. They can then be synchronized for certain data using the card relation field, look up, and automations.
To clarify the links between workspaces and their visibility, you can bring them together within a team.
Why use the Team space?
The Team space allows you to create sub-spaces of the Organization to bring workspaces together as in folders.
Use the Team space if:
👉you have many workspaces and you want to improve the readability of your Organization page.
👉you want to manage permissions more finely at the team level.
As with workspaces, you can decide whether or not to make your team visible at the Organization level and whether Organization members can become members of your Team without invitation. To do this, go to the Settings / Access section of your Team.
Remember :
- you cannot add a new user within a team if they have not been previously added to the Organization.
- if you are an Admin, their permissions at the Organization level take precedence over permissions at the Team level, they will automatically have access to the Team.
- for all other roles, the person will need to be added to the Team.
- the Team cannot have its own card types, fields, roles, or workspace templates. It inherits those available at the Organization level.
The Administration space - Organization Admin (Team & Business Offer)
License count
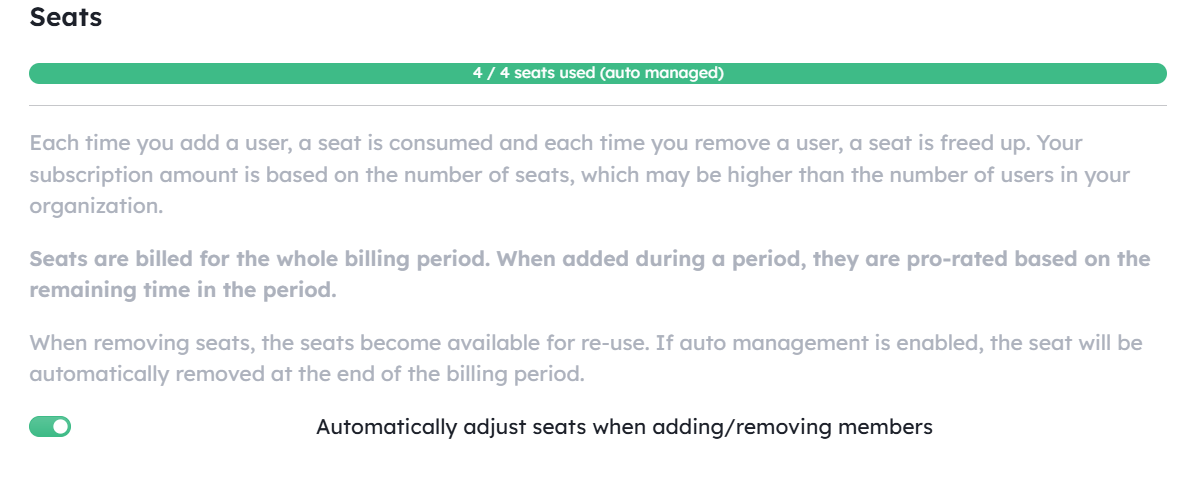
A license is counted for each member of your organization. Guests on workspaces but external to the organization are observers on the workspace and therefore do not need a license.
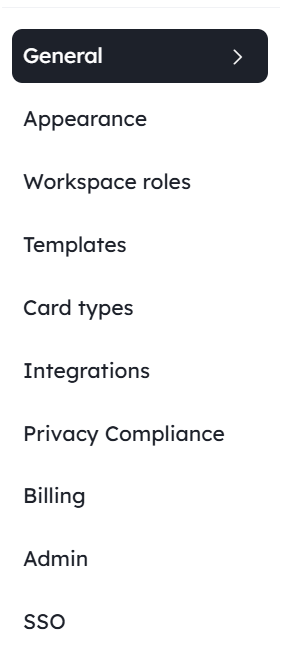
General
Manage here the name of your organization and its appearance
Workspace roles
View here the existing roles at the Organization and workspace levels. From this section you can create custom roles. [See Roles Guide](/help/guides/collaboration#managing-roles-and-permissions)
Card types
View and manage shared fields at the Organization level. [See Organisation field Guide](/help/guides/customize-cards#fields-from-team)
Integrations
Activate here the integrations that can use third-party accounts.
Organization Settings / Billing (Team & Business Offer)
You can:
- select / modify your offer
- modify your payment method
- download your invoices
- activate automatic seat adjustment
- suspend your subscription
Personal data
Download here the report of all personal information identified in the Organization. [See GDPR Guide](/help/guides/gdpr#manage-personally-identifiable-information-pii)
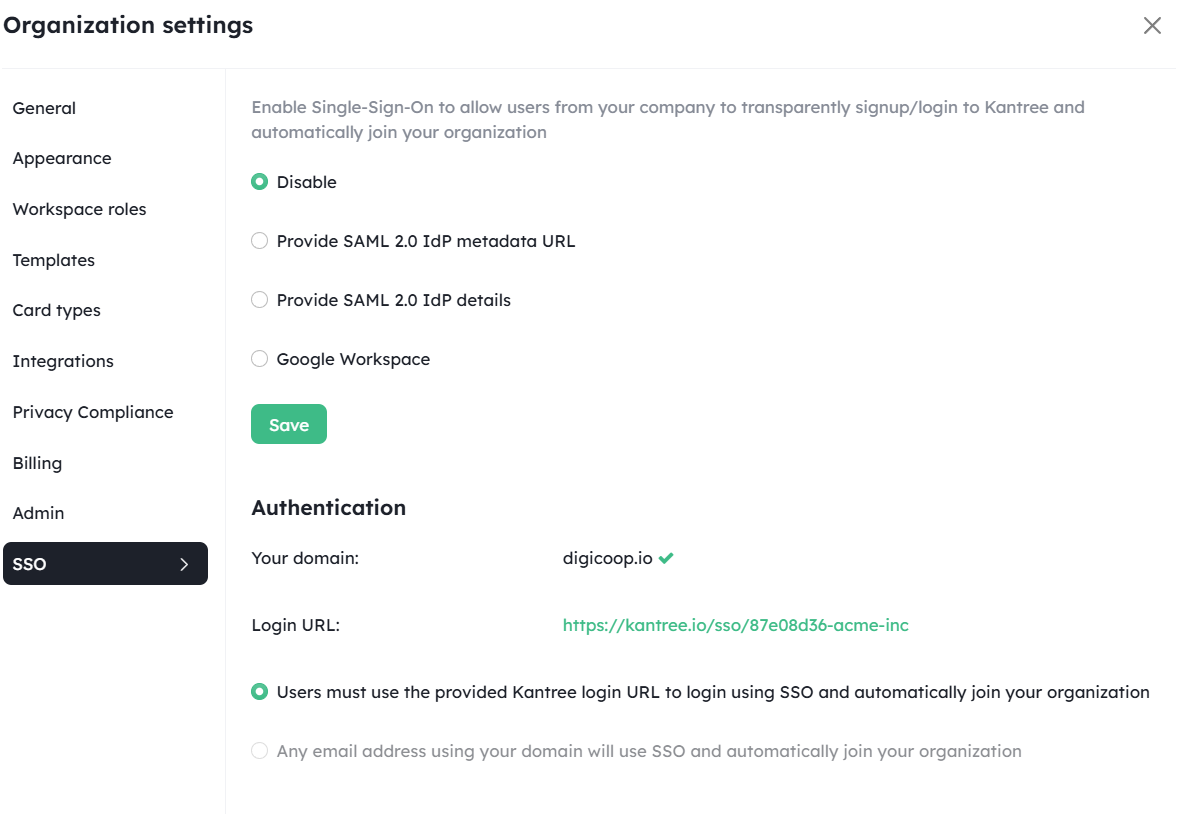
SSO (Business and Enterprise Offer)
Organization Pages - Members Section
To add members to your Organization, go to the Members section of your Organization page.
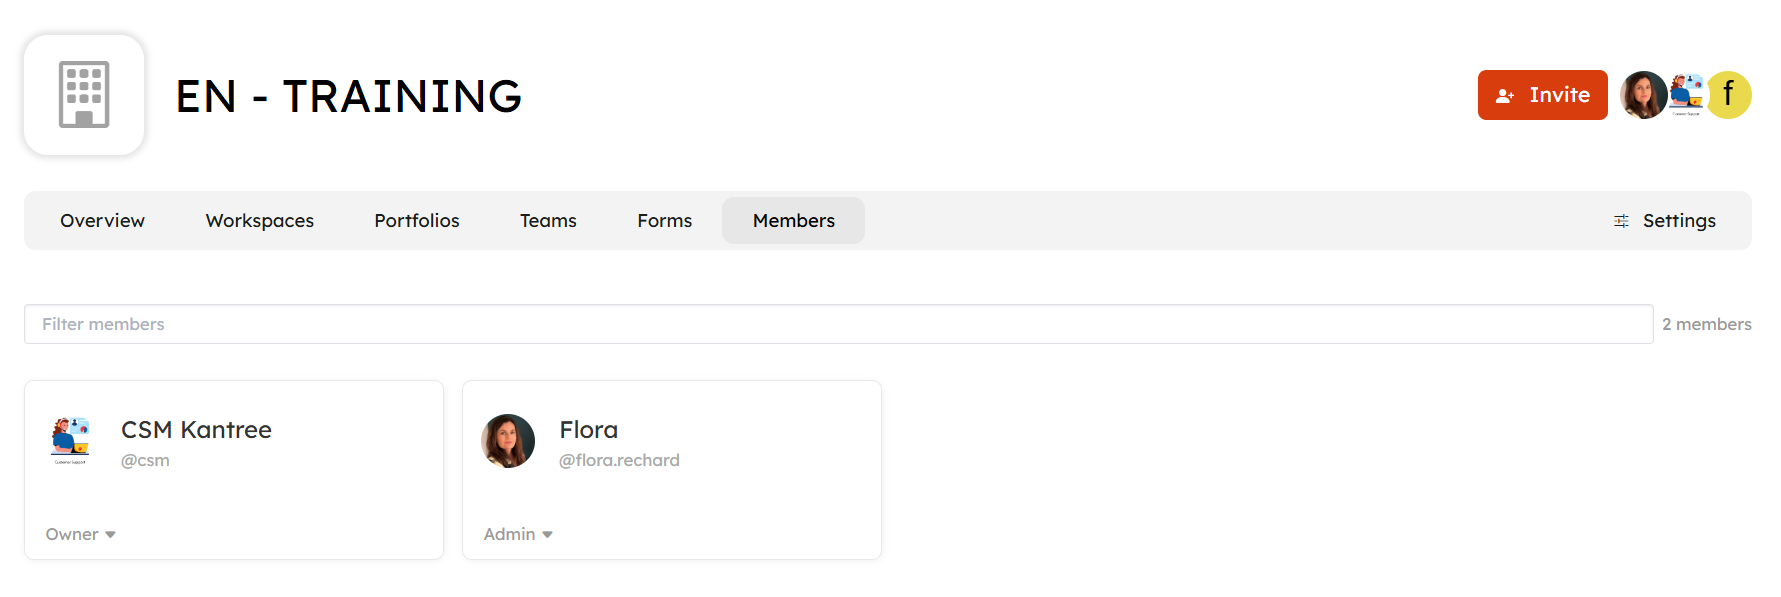
Here you can invite members and modify their roles. The invited person receives an email inviting them to join the Organization.
The Administration space Organization Admin - Enterprise Offer
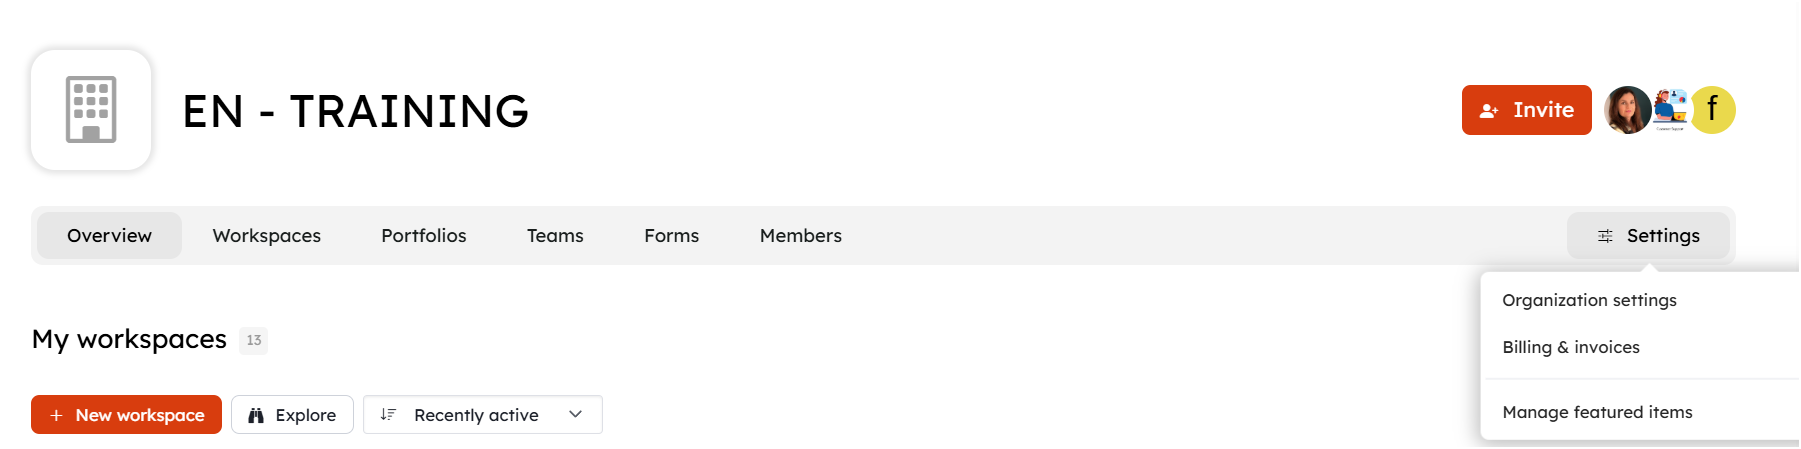
Find the Settings from the Organization page.
These are the same sections as for the Business Offer (see above) without the Billing section.
The Superadmin Administration space - Enterprise Offer
Admin Enterprise Offer / Activation
When activating your account, we will activate the number of available licenses, your Administrator access as well as a Kantree Administrator. This is necessary in case of intervention, for example in the absence of your Administrator. Of course, this access does not count towards a license.
Admin Enterprise Offer / License count
A license is counted for all users except for “Free access” roles When the number of licenses is exceeded, users automatically have a “free access” role which allows them read-only access.
When you invite users from the Organization, or the Workspace, these future licenses are anticipated in the count (even if the person has not yet validated their license) It is possible to set up automatic deactivation of licenses when they are inactive for X days, for this contact support@kantree.io
You will find the section dedicated to Superadmin by clicking on your account icon in the bottom left.

Admin Section / Overview (Enterprise Offer)
Total number of users: all users with or without active licensesLicensed users: all users with an active licenseActive users: users who have performed an action in the last 30 daysDeactivated users: deactivated users (not counted in licenses, can no longer access their Kantree account)Unlicensed users: free access / observersTeams: number of existing OrganizationsWorkspaces: number of active and archived workspaces
Admin Section / Users (Enterprise Offer)
Using filters, you can find organizations, workspaces, and users. Some filters allow you to filter by user activity.
Search by user, email, id, organization, workspace

Filter
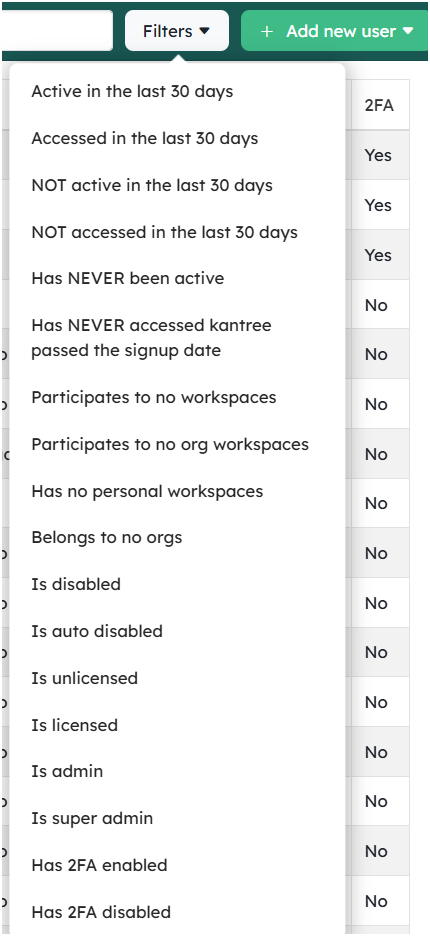
In this section, you access the list of users. By clicking on the user’s name, you can view the details of their profile (permissions, memberships to organizations and workspaces) and take actions on their permissions. You can also reset a password and impersonate to “view as”
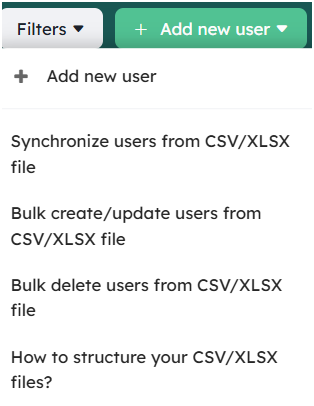
Synchronize
- if a user is present in the import file and on Kantree => this user’s data is updated on Kantree
- if a user exists in the import file and is not present on Kantree => the user is added to Kantree
- if a user is not present in the import file and is present on Kantree => the user is deactivated (license deactivation, no deletion) in Kantree
In this last case, it is possible to configure 3 actions: deactivation, deletion, unlicensed observer mode.
Add/Update
- if a user is present in the import file and on Kantree => this user’s data is updated on Kantree
- if a user exists in the import file and is not present on Kantree => the user is added to Kantree
During import, all lines are examined against your imported file.
username
email
password: if you are updating users, this will be ignored\
And the following optional columns:
- role: only one among deactivated, unlicensed, user, superadmin
- display name: leave empty to use the username
- if the user can join teams: “yes” or “no”
- if the user can create Organizations: “yes” or “no”
- if the user can create projects: “yes” or “no”
- if the user can create private projects: “yes” or “no”
- if the user can invite guests: “yes” or “no”
- if the user must reset their password on login: “yes” or “no”
Note: you cannot skip columns. If you want to set the value to indicate that the user can create teams, it must be in the sixth column. Leave optional columns you don’t want to set empty.
If the first two columns match an existing user (can be either), the existing user will be updated.
Delete
The file must have two columns: username and email. Matching will be done on either.
Create or update users in bulk You can create or update multiple users at once using a CSV file with the following columns:
Export
You can export the list of users by clicking at the bottom of it on “Export to XLSX”
Admin Section / Organizations (Enterprise Offer)
Click on the organization’s URL to access it and particularly its settings.
Export
You can export the list of Organizations by clicking at the bottom of it on “Export to XLSX”
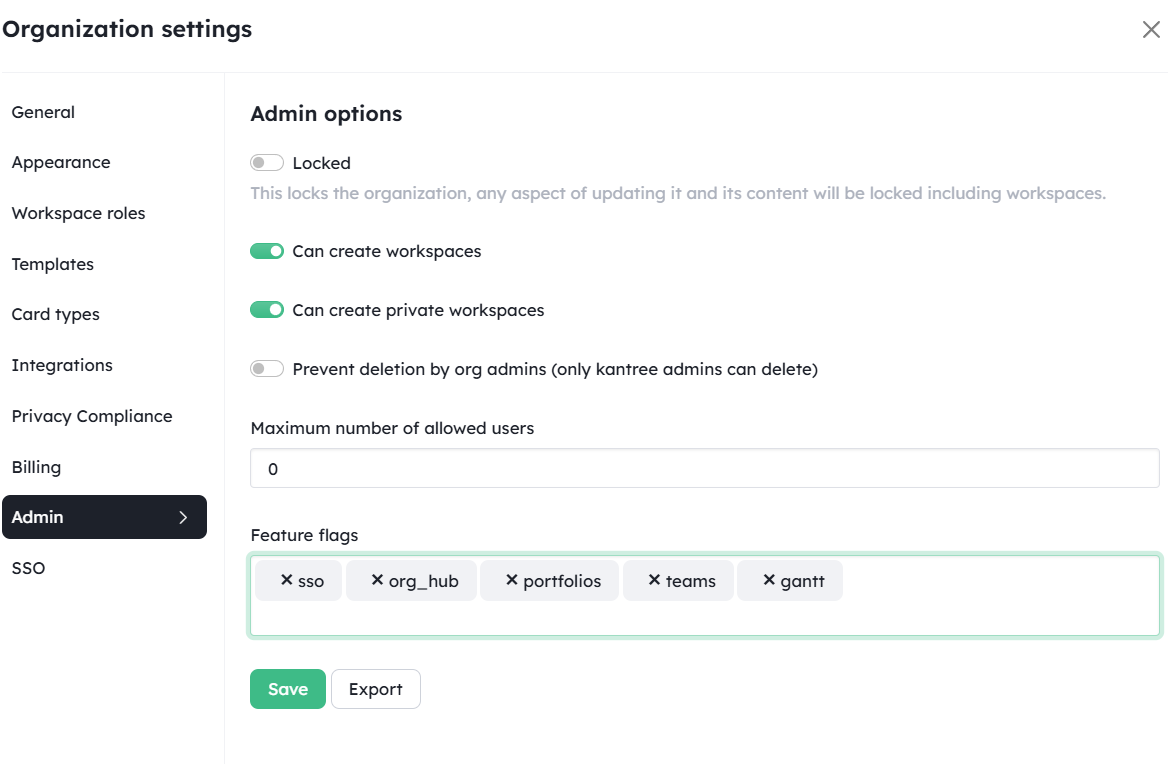
Organization Settings / Admin Section
In the Organization settings, you will find an “Admin” section. The Superadmin can configure options in the Organization: workspace creation, private workspace creation, organization deletion right. It can also limit the number of users on the organization. The “Features flags” section allows you to activate or deactivate certain features (add name + entry + save)
Admin Section / OAuth Applications (Enterprise Offer)
Add here the Applications with which you want to use the oAuth protocol